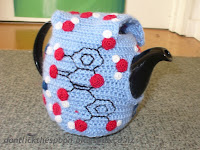
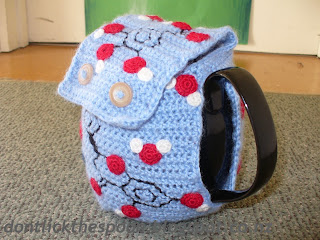
A while ago now, I made a
tea cosy which had a number of the molecules in tea embroidered on it. I've been meaning to write up the pattern for a long time, but things just keep getting in the way. But I finally managed to find some time (most of it was written during talks at a Chemistry conference), so here it is!
I made this for the tea pot that my boyfriend mostly uses, and I thought that he'd be much more likely to use it if I made it so he didn't have to keep taking the cosy off every time he made tea. So I designed it with a flap over the lid, which is buttoned down. It also gave me extra space to embroider, which was a nice bonus.
Pattern
The pattern is written so that it can be adapted to any tea pot, rather than specifically for the one I made it for (which was a bit of an odd one any way). This does require that you do some measuring and basic maths, but don't let that put you off!
Things You Need
- Measuring Tape
- 2 Buttons
- 2 Crochet hooks - 2 mm and 5.5 mm
- 4 ply yarn in red, blue, while and black
- 8 ply yarn in light blue (or other base colour)
Stitches
hb - herringbone stitch. yo, insert hook into stitch, yo and draw through stitch and the first loop on the hook at the same time, yo, draw through one loop, yo, draw through both loops on the hook. (This is just a hb work in the front loops of two st at the same time).
hbdec - herringbone decrease. If the right side of the work is facing towards you, yo, insert hook into the front loops of the next two stitches, yo and draw through stitches and the first loop on the hook at the same time, yo, draw through one loop, yo, draw through both loops on the hook. (This is just a hb worked in the front loops of two st at the same time).
If the wrong side of the work is facing towards you, repeat the above, but instead of the front loops, use the back loops of the next two st - yo, insert hook into the back loops of the next two stitches, yo and draw through stitches and the first loop on the hook at the same time, yo, draw through one loop, yo, draw through both loops on the hook. (This is just a hb worked in the back loops of two st at the same time).
Alternatively, just do a standard dc dec.
Clean fasten off - Fasten off as usual, but leave slightly longer tail. Thread the yarn onto a needle. Going from front to back, insert the needle into first stitch of the round (where you would normally put a crochet hook - under the top loops) and pull it through. Now put the needle back through the top of the last stitch of the round and pull tight. This will be the same place where the thread comes out of, so you will have made a loop that comes out, goes through the first stitch then comes back to the same place (It should look a lot like the loop of a crochet stitch).
Cosy
- Make a gauge square - it's important to do this to get the sizing info for your measuring/calculating. Also, the foundation row is a lot looser than the main stitch, so a few rows are needed to get it to the right tension.
Gauge square row 2: ch 3 (counts as hb), turn, 11 hb.
- Repeat row 2 for about 4-5 rows until the piece is no longer getting narrower. Measure the middle 10 st of one of the top rows to get the gauge (e.g. 5 cm (2 in) for 10 st).
- Measure the tea pot at the widest horizontal point between the spout and handle (e.g. 15.5 cm). Only measure along the body, until you hit the spout and the line for the handle (you probably won't actually hit the handle as it will be sticking out). From your gauge, calculate how many st fit into this length. (e.g. length is 15.5 cm, gauge is 5 cm for 10 st. 15.5 cm/5 cm x 10 st = 31 st needed.)
Cosy row 1: foundation sc the number of st you calculated (
e.g. 31 st).
Cosy row 2: ch 3 (counts as first st), turn, hb st in each st to end of row (e.g. 31 hb).
- Repeat row 2 until piece measures from the ground to the top of the spout (if that is shorter than the handle). Tie off.
- Make a second piece the same size, but don't tie off
- ch3 (counts as first st), turn. Put both pieces side-by-side (making sure that the stitches are facing the same way). Work the next row of hb st across the top of both pieces (e.g. 62 hb).
- Continue to work across both pieces until the length of the piece reaches the top of the handle. Join with a st st in the beginning ch. From now on, you will be working in the round. Begin each row with a ch 3 and turn, end with a st st join in 3rd ch.
- The piece will now have two flaps, a short slit for the spout and a longer one for the handle.
Decrease
- Measure around the hole in the top of the pot, and work out how many stitches this represents. (e.g. distance around is 15 cm. 15 cm/5 cm x 10 st = 30 st) You will need to end up with this many stitches, so work out how many you will have to decrease (62 - 30 = 32 st to decrease).
- Next measure the distance from the top of the handle to the hole (e.g. 5 cm). Now measure how many rows fit into this distance (e.g. 4 rows). This is the number of rows you have to do the decreases in.
- Now work out how many stitches to decrease per row. Divide the number of stitches by the number of rows (e.g. 32/4 = 8 stitches to dec per row)
- Spread the dec out evenly across each row. For example, for the 62 st:
row 1: ch3 (counts as first st), turn. 4 hb, hbdec, *6hb, hbdec* x3, 5hb, hbdec, *6hb, hbdec* x3, join with a st st (54 hb).
row 2: ch3 (counts as first st), turn. 3 hb, hbdec, *5hb, hbdec* x3, 4hb, hbdec, *5hb, hbdec* x3, join with a st st (46 hb).
row 3: ch3 (counts as first st), turn. 2 hb, hbdec, *4hb, hbdec* x3, 3hb, hbdec, *4hb, hbdec* x3, join with a st st (38 hb).
row 4: ch3(counts as first st), turn. hb, hbdec, *3hb, hbdec* x3, 2hb, hbdec, *3hb, hbdec* x3, join with a st st (30 hb).
Note: The tea pot I was using had an unusually low lid, so I'm not sure how this will look for other pots. Adjust it as needed until you like the look of it.
- Measure the distance over the top of the lid from one side of the top hole to the other. Work out how many stitches this is (e.g. distance across is 9 cm. 9 cm/5 cm x 10 st = 18 st).
- In the last row, find the centre point of one of the sides (which would be in between the spout and the handle, about 1/4 of the stitches around from the end of the row). This will be where the middle of the top flap is, so count out half the number of stitches to each side of this point (e.g. 9 st to each side for a total of 18 st).
row 1: making sure that the stitches are going the right way relative to the last row, attach yarn, ch 3 (counts as first st) and work the appropriate number of hb st (e.g. 18 hb).
row 2: ch3 (counts as first st), turn, hb to the end (e.g. 18 hb).
- Keep working row 2 until the piece covers the top of the pot and reaches the point where you want to place the buttons on the other side.
- ch3 (counts as first st), turn. Work a few hb in from the side, depending on where you want the buttons. Work ch st until you have a hole large enough for your button to fit through, skipping 1 hb for each ch you work. Work hb until you get to the point on the other side where the other button hole will be placed (making the work symmetrical). Repeat the same number of ch and hb as for the other button hole. (e.g. ch 3, turn, 2 hb, ch3 (skipping 3 hb), 6 hb, ch3 (skipping 3 hb), 3 hb. (12 hb, 6 ch, 18 st total))
- ch3 (counts as first st), turn. Work hb across, working 1 hb per ch (I just do them in the ch space, rather than the actual chain because it's easier).
- Continue working row 2 until the flap has the desired length.
- ch1, sc around the edges of the flap and the rest of the hole. Make sure that the right side of the work is towards you. If not, turn at the start of this row so that it is. Fasten off.
Sewing Up
- Sew up the two side slits to the bottoms of the handle and the spout respectively.
- sc around the edges of the two holes that are made by doing so.
- Attach the buttons so that they fit in holes made for them in the top flap.
Molecule Embroidery

Gallic acid
Hesperetin (a flavanone)
Caffeine (awesome)
Quercetin (also a flavanone)

Theanine (an amino acid)
- Embroider the lines of the structures in black thread (I used 4 ply wool, but I recommend using something thicker)
- Make the appropriate number of nitrogen, oxygen and hydrogen circles:
Oxygens and Nitrogens
row 1: 6 sc in a magic circle, join with a st st in first sc (6 sc).
row 2: 2 sc in each st, clean fasten off, leaving a long tail for sewing (12 sc).
Hydrogens
row 1: 6 sc in a magic circle, clean fasten off, leaving a long tail for sewing (6 sc).
- Place where indicated by the diagrams
- Fill in empty spaces with water (H2O) molecules
For extra chemistry nerd points:
- In 3D, the angles between NH and OH and the rest of the molecule are 109.7°, but are usually drawn as 120° in 2D, so try and sew them as something close to this (basically don't make them 180°!)
- When putting in the water molecules, I was a super geek and factored in hydrogen bonding. This meant that when next to an oxygen or a nitrogen, I had a hydrogen of the water pointing towards it, and when next to a hydrogen, I had the oxygen pointing towards it and the hydrogens pointing away.


